Pages

January 30, 2015

Valentine's Day Candy Card


Lets start the countdown…16 days till Valentine’s Day. 16 days till I sit at home, watch a romantic comedy, and eat way to much popcorn ice cream! Of course I have a date! Well, you see I actually have three. But I haven’t decided which one I’ll invite over this year. Me, Myself, or I….let me tell you it’s difficult.

When you’re your own date you kinda have to buy/make your own gifts too. I’m not the kind of girl that would want a dozen roses and little teddy bear. I mean if a guy ever did that I’d be grateful and happy because that’s just the kind of person I am, but I’d much rather go to Handel’s for ice cream. Here’s the secret: Ice cream makes everything better. Yes folks, if you can remember that little piece of advice you’re life will be golden. Anything goes wrong; you have a bad day, break up with a girl/boyfriend, it’s raining or snowing, it’s -16° outside, bad sports practice or game, just about anything…have a nice big bowl of ice cream. I guarantee you’ll feel better. To be quite honest you might as well just eat from the container. You’ll really feel good after that!


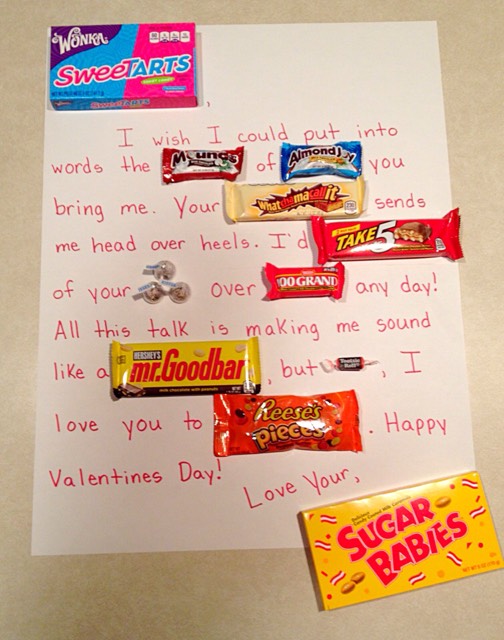
Back on topic, I decided to make myself a candy card this year. If someone gave me this as a gift I would probably marry them right there. Why? Let me explain. Chocolate, brilliance, humor…what more could you ask for? You gotta pounce on those ones! Even if the got the idea on the internet and it literally took 10 minutes to put together, I don’t care. They’re amazing.


So guys, here’s how you impress your lady. Go to the gas station, grocery store, dollar general, you get the point. Buy everything on the list of material below if you don’t already have it. On your drive home, swing by Handel’s and pick up a $5 dollar gift card. (to mail to me of course!) I guess if you have to you can skip that last step. Lay everything out on a table and copy the message below in pencil. (bold words are candy bars) If your happy with the spacing, which I know most guys could careless, trace over the pencil in sharpie. Erase any visible pencil lines and tape on your candy bars.


If your sweet(tart) doesn't fall head over heals just send the card my way! I’ll be more than happy to take it off your hands!


What You’ll Need

Mounds
Almond Joy
Whatchamacallit
Take 5
Hershey Kisses
100 Grand
Mr. Goodbar
Tootsie Roll
Reese’s Pieces
Sugar Daddy’s
Poster or other large paper
Pencil
Sharpie
Tape

January 29, 2015

Potato Soup


What are we on now, snow day number four? Pretty soon I'm gonna start losing track! And two-hour delays. Yeah, I don't even try to count those. Not enough fingers and toes. 


To be honest though we're literally snowed in. Take a look at our driveway bobsledding track. Let me tell ya, the turn is just lovely! Barb wire or electric fence? Take your pick! If it wasn't for the snow piles (aka-bumpers) I'd a taken both out eons ago! 

So mom and I decided it was a good day to make potato soup. We finally have some freezer space and really, what else was there to do? Great mother-daughter bonding experience. Totally recommend it! Mothers and daughters that peel/chop potatoes together stay together! Okay...I think it's time to move on...


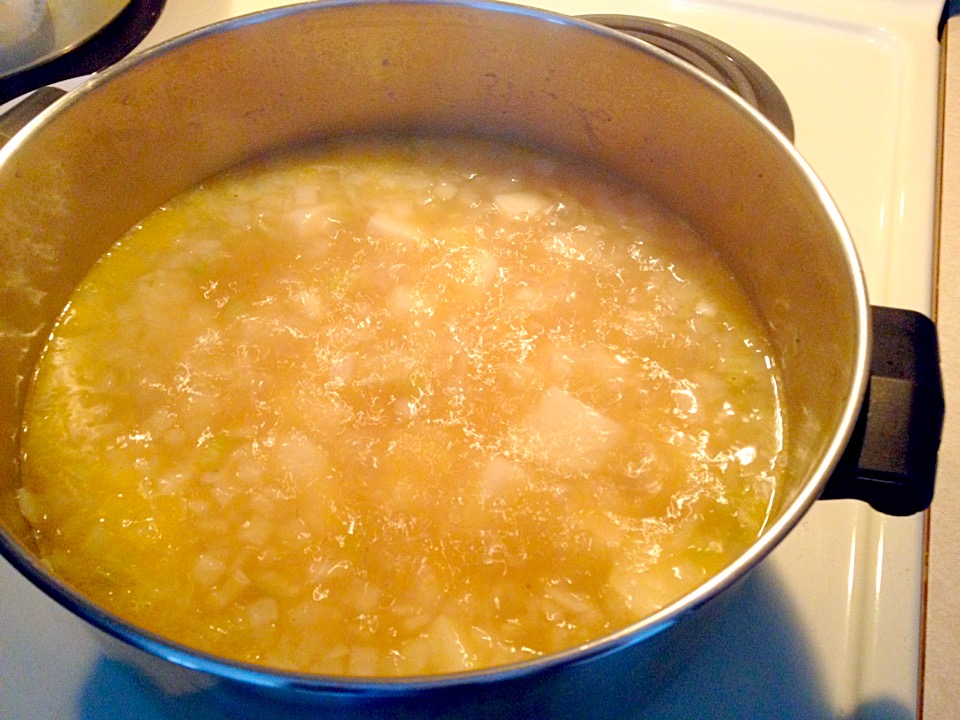
Start by peeling, rinsing, and chopping the potatoes. You'll wanna cut em in half, half again, then chunks. Keep going till there's a good six cups and add em to a large pot. 


Pour in the chicken broth.


Add the onions, celery, and margarine/butter.  Fresh or frozen don't make a difference.  Around here we like to freeze pre measured bags of onions and celery. One- we grow way to many onions and Two- it's so much easier! 


Add the salt...


And the pepper...


Now just a quick stir, put on the lid, and bring it to a boil. You'll wanna cook it until the vegetables are fork-tender. 


Turn down the heat to medium-ish and stir in a can of sweetened condensed milk. Now here's the important part. Cook another 30 minutes, stirring often, but DO NOT LET IT BOIL. Got it?


Now this is all personal preference. You could leave the soup as is (chunky) or 


let it cool slightly and throw it in a food processor/blender (creamy). We prefer it creamy, but you could even do a half-half kinda thing. 


Potato Soup

:Ingredients:
6 cups potatoes, peeled and cubed
5 cups chicken broth
2 cups onions, chopped
1/2 cup celery, chopped
1/4 cup butter or margarine
2 teaspoons salt
1/2 teaspoon pepper
12 ounces evaporated milk

:Directions:
Combine first seven ingredients in a large pot.  Cover and cook until vegetables are tender, stirring often.  
Reduce heat to a simmer and add evaporated milk.  
Cover and cook 30 minutes, stirring frequently, not allowing the soup to boil.
Allow to cool slightly before pureeing in a food processor or blender.

Click for printable recipe.

January 26, 2015

Snicker Doodles


Sometimes I wonder how people have a "favorite cookie".  Seriously, you can pick one?  How can you single out one type of cookie when there's chocolate chip, peanut butter, pumpkin snicker doodles, white chocolate cranberry?  You must be a real cookie expert... Unfortunately I haven't reached that status yet.  Better keep sampling them all.


A couple weeks ago there was a bake sale at school.  Imagine that! Kids, cookies, brownies, cupcakes, donuts.  It just goes together way too well. Let me tell you, if the government had a bake sale in every school across the country just one day, they'd be out of debt.  Possibly even have some extra Benjamin's to spare! Kids love food!


Let me rephrase that... Who doesn't love cookies, brownies, cakes, donuts, chocolate covered whatever, etc.???? You're just not American if you don't!  Once again getting myself way off topic.  Anyways, I made these for the bake sale at school.  No, not for the government bake sale, a senior project bake sale.  One teacher in particular absolutely LOVES these cookies.  Like they are her FAVORITE.  One and only favorite. Yes, just one type!  She always has to buy one a couple plateful.  Next time I'll just bring an extra tray with her name one it.  One for the bake sale and one for her!

Snicker Doodles

by Simple and Sweet Creations
Ingredients
  • 1 cup butter flavored Crisco shortening
  • 2 eggs
  • 1/4 teaspoon salt
  • 1 1/2 cups sugar
  • 1 teaspoon cream of tarter
  • 1 teaspoon baking soda
  • 2 1/4 cups flour
  • Cinnamon Sugar
Instructions
In the bowl of a standing mixer, combine the first six ingredients.
Stir in flour, adding more if batter is too sticky.
Roll balls in cinnamon sugar mixture.
Bake at 350* for 8 to 10 minutes.

Powered by Recipage

January 25, 2015

The BEST Valentine's Day Card


This is for all those guys out there that dread Valentine's Day shopping. What should I get her?  What if she doesn't like it?  ...wait...I have to buy her something?!  Sound familiar?  Don't worry you've come to the right place.

Unless you have some spectacular idea, go with chocolate and something that will make her smile.  After typing that sentence I realized any "spectacular idea" from a guy is a little risky and should probably be avoided.  But hey, suit yourself!  Coming from a girl, you can't go wrong with chocolate!


Now I know guys like simple.  Quick, easy, straight to the point.  Here's what you need to do.  Go to the gas station/grocery store/dollar general/etc. and buy the candy bars.  (you'll find a list at the bottom) If you don't have a big piece of paper or something to attach them to already, pick up one of those also.  


Now lay everything out on your poster and copy the message below. (bolded words are candy bars)  I suggest writing in pencil first and then going over it in sharpie.  That way you're able to erase mistakes.  

Sweet Tart,

     I wish I could put into words the Mounds of Almond Joy you bring me.  Your Whatchamacallit sends me head over heels.  I'd Take 5 of your Kisses over 100 Grand any day!  All this talk is making me sound like a Mr. Goodbar, but Tootsie Roll, I love you to Pieces.  Happy Valentine's Day!

Love Your, 

Sugar Daddy


Finally, tape the candy bars in there place.  Now was it that painful?  Give this to your sweetheart and I guarantee she'll SNICKER!  


What You'll Need

Mounds
Almond Joy
Whatchamacallit
Take 5
Hershey Kisses
100 Grand
Mr. Goodbar
Tootsie Roll
Reese's Pieces
Sugar Daddy's
Poster or other large paper
Pencil
Sharpie
Tape

January 23, 2015

Turkey Bean Sloppy Joe's


After practically eating the entire pot of sloppy joe's, I realized I can't make my mom's traditional recipe any more.  It's just too good and once I start I can't stop!  It needs to be under lock and key!

Compared to two pounds of hamburger, turkey and beans is a little healthier.  You could even swap out the turkey for ground chicken or beef, or two more cans of beans.  For three days straight this was my dinner and it was the best meal of my life.  

Recently dinner at our house has been a "fend-for-yourself" meal. Between work, gymnastics, basketball, games, etc. everyone is home at different times on different days.  Friday's are really the only days we're all together.  Last Friday we decided to all watch a movie together.  If you haven't seen When the Game Stands Tall, I recommend renting it. Here's Amazons summary...


Inspired by the true story, Jim Caviezel plays high school football coach Bob Ladouceur during the season that changed everything. As coach of the Spartans Football Team, Bob always tells his players that winning doesn't matter. Yet somehow, with the aid of assistant coach Terry Eidson, he’s led the team to a record-breaking 151 straight victories. When his wife Bev urges him to refocus on his family, Bob is blinded by the pressure to keep the streak alive. Now, in the midst of a season of crisis and tragedy when the Spartans stand to lose everything, a remarkable young player helps Bob rediscover that teamwork outshines personal glory When The Game Stands Tall.


Turkey-Bean Sloppy Joe's

by Simple and Sweet Creations
Ingredients
  • 1 pound ground turkey
  • 1 can pinto beans, drained
  • 1 can red kidney beans, drained
  • 10.75 ounces condensed tomato soup
  • 10 ounces ketchup
  • 1 tablespoon Worcestershire sauce
  • 2 tablespoons vinegar
  • 2 tablespoons brown sugar
  • Salt and pepper, to taste
Instructions
Brown turkey in a large pot until fully cooked.
Stir in remaining ingredients.
Cook on low until heated through.
Freezes well.

Powered by Recipage

January 20, 2015

The Ultimate Slider Workout


This past summer my coaches decided to start experimenting with some new conditioning. I don't blame them, the old ways were getting a little boring! When they bought per a dozen furniture sliders and told us these were our new best friends, I was a little skeptical. How are we supposed to get a good workout using these?!

Don't run away too fast! Try some of these exercises and you'll be feeling the burn too! They actually give you a really good leg workout. Mine may have been sore for a week!


All you'll need is set of furniture sliders. Any shape will work, but we all liked ovals the best. Of course you'll also have to have a large (or long) carpeted area too. Hallways work great!

1. Lunge Walks - place one carpet slider under each foot and lunge walk keeping your feet and the sliders on the floor the entire time.  The number of laps will depend on your spaces length.

2. Wheelbarrows - sit down and place both feet on one slider. Push up onto your hands so your feet our out in front of you. Trying to keep you stomach up, slide forward and back. The number of laps will depend on your spaces length. 

3. Inchworms - stand with both feet on one slider. Reach down towards your toes and put your hands on the floor. Walk your hands out to a push-up position and hold, then slide your feet back up to a pike. Repeat. The number of laps will depend on your spaces length. For more of a challenge, replace the hold with push-ups. 


4. Split Races - slide into a split and place one slider under each foot. Using your hands, walk/slide forward. As you can see, we even raced our coaches! Of course we won! 

January 18, 2015

Peach-Pineapple Smoothie


My blender and I have become very close over the last seven days. I've been making something new nearly every day! Abby loves it when mom or I bring her a smoothie after basketball. She's always starving! 

We just happened to have some pineapple in the fridge I needed to use up. It was getting a little too ripe to eat. Instead of the regular peach smoothie with peaches and peach yogurt, I swapped peaches for pineapple. Abby won't know the difference! 


Turns out she loved it! I even put the rest of the pineapple in little bags so she could make her own smoothies when I'm not home. 


Peach-Pineapple Smoothie

by Simple and Sweet Creations
Ingredients
  • 3/4 cup milk
  • 1/2 cup peach yogurt
  • 1 cup pineapple, diced
  • 1 cup ice
Instructions
Combine all ingredients in a blender.
Blend until smooth.
Pour into glass and enjoy!

Powered by Recipage

January 16, 2015

How To Clean Tennis Shoes


Every time I buy new tennis shoes I promise myself they won't have any white.  Guess I'm not very good at keeping promises...


So I buy black and white shoes.  Of course the white turns black within a week, no matter how hard I try to keep it clean.  Yes, I am the person who walks around puddles and dirt in parking lots.  The one who walks all the way down the sidewalk instead of cutting though the grass.  I don't want my shoes to get dirty!


But they do.  For years I tried wetting a rag and wiping them off without much success.  Yes, it got the worst of the dirt off, but they were never truly white again.  Then I came upon arguably the best cleaning product on the market!  The Mr. Clean Magic Eraser!  (p.s. - we've bought the generic brand from Walmart before and they work just as good.  A lot less expensive too!)  Here's what you need to do.


First wet and wring out the magic eraser.

If your tennis shoes are really muddy, etc. I suggest taking a paper towel or rag and wiping them off first.  Your magic eraser will last a lot longer if the worst of the dirt is off.


Now lightly scrub any white parts until they shine.  Some spots will be easier than other.


Look how beautiful!  Almost like new again!  They shine just as much as the diamonds!

January 15, 2015

DIY Bedazzled Tennis Shoes


Okay lets be honest.  When you pin a craft or a recipe or an idea on Pinterest, half the time you never make or try it.  Who has time to try 463 recipes, 248 DIY projects, and 127 home remodels?  No me!  


But when I came upon these bedazzled Nike tennis shoes I knew I had to try them!  They just caught my eye!  Look at them!  The only part I don't like...they're white.  They're gonna get super dirty and need cleaned everyday.  

Well it just so happened I was getting ready to buy a new pair of shoes.  Of course Nike!  I've tried other brands and they just don't compare.  (unfortunately, I am not affiliated with Nike in any way.  I just really like their products)  And the "check" is perfect for bedazzling!  


So I went to Hobby Lobby and bought these Clear Crystal Rhinestones. Thinking I'd be using a ton of stones, I bought three packages.  You only need one.  I didn't even use one.  Oh well...now I can bedazzle all my shoes!


As for attaching them, I used this E6000 Clear Glue.  It seems to hold them great.  I've been wearing my shoes for two years and not a single diamond has come off.  They've been rubbed against chairs, through the snow and rain, etc.  No problems whatsoever!


I recommend working in sections.  I set my shoes on it's side and laid out the diamonds first.  That way I was able to move them and get them to fit right.  Then I took two or three off at a time and glued them on.  After trial and error I've found it easiest to use a paint brush and brush the glue on the shoes.  You can try to squeeze glue on each diamond, but it's a little more difficult.  Try each method and see which one you prefer.  They both have the same outcome!


Let your shoes sit at least two days before wearing them.  Don't even touch them!  The glue needs some time to dry and harden!

January 10, 2015

How to Save Money at the Grocery Store


These days we're always looking for ways to cut back.  I know I'd do a little extra to save a buck!  Speaking of buck...gas down to a dollar! What?!  Finally!!!  Last week my dad came home from work and said he paid $1.75 a gallon!  When I started driving gas nearly $4.00!  $1.75....I can afford to go places now!


Maybe I'll go to the grocery store and get more baking supplies.  I still have a lot of recipes to post!  Unfortunately, grocery prices aren't dropping also.  In fact, some things are just skyrocketing.  Chocolate chips?  You don't understand my family's addiction to chocolate chip cookies.  We easily go though a batch (60 cookies) in two weeks.  So sad.


So what do I do to bring our grocery bill down?

1. Make a Menu - planning the weeks dinners in advance lets you know exactly what you need ahead of time.  This way you'll make one trip to the store.  Extra trips means more gas, more unneeded items, wasted food, etc.  

2. Scan the Ads - before you go, take a look at the ads.  I know Walmart will match any competitors lower price on the same item.  Just bring the ad with you and show the cashier!  They're happy to rollback their rollbacks even more! (as long as you're nice about it!)

3. Savings Catcher - anyone who shops at Walmart listen up!  They have this new thing called Savings Catcher.  After your done shopping, scan your receipt with a smartphone or type the information into a computer.  Walmart will search local competitors for lower prices on the items you purchased.  If someone is selling something at a better price, you'll get the difference back on a Walmart gift card!  All you need to do is sign up for a free account and start saving!

4. No Throwing Away - plan your meals around each other.  If you need a little chicken for Wednesdays dinner, have chicken Monday or Tuesday and make a little extra.  You can use the leftovers in Wednesdays dish.  On the same token, plan leftover days.  Leftovers make great lunches and quick dinners!  My family usually has leftovers on Wednesdays because we're all home at different times.  Just make sure you cook enough the prior days!

5. Use What You Have - try to use the food you've already bought before going out and buying something else.  Chances are you can find a recipe on Pinterest to use up that can of whatchamacallit that was on sale!

6. Cook at Home - believe it or not, it's cheaper to eat at home than it is to eat out.  If you plan your meals around weekly sales and specials, cooking at home becomes more affordable.  Not to mention it's a lot healthier too!

7. Stock Up on Sales - take this advice with some common sense.  Obviously if lettuce is on sale for $0.50 I'd pick up a head, not ten.  Only stock up on nonperishable items.  For example, canned goods and frozen items.  Just keep track of the dates!

8. Home Grown - seeds cost next to nothings, so, if possible, grow your own.  Home grown fruits and vegetables taste amazing.  Yes, they are a little work, but it's a great way to get some exercise and fresh air!  

9. Coupons - check for newspaper, magazine, and online coupons.  I like to check coupons.com before I go to the grocery store.  Just be careful.  Only clip the coupons you need.  Coupons make it easy to buy items you'll never use.

10. Generic - if possible, buy generic items.  Generally, they are the exact same product as name brand items, just different packaging.  Yes, my mom used to work in a meat packing plant and the only difference is the stickers.  

January 9, 2015

Banana Bread (the BEST ever!)


Banana bread is my go-to recipe when we have overripe bananas. It's simple, quick, and easily freezes. Nothing is better than pulling out a loaf in the middle of a school week. Breakfast...check! Now if only dinner were that easy!


It took some time to find the "perfect banana bread recipe" but I think we've got it. You'll never guess where. Mom actually tried the recipe on the back of the Gold Medal Flour bag! It was delicious!

Warm, cold, room temperature...in the morning this bread is amazing anyway. Butter, plain, my sister even spreads it with Nutella! So much easier than making Banana Nutella Muffins and it tastes exactly the same!


Banana Bread (the BEST ever!)

by Simple and Sweet Creations
Ingredients
  • 1 1/4 cups sugar
  • 1 stick butter or margarine, softened
  • 2 eggs
  • 3 or 4 ripe bananas, mashed
  • 1/2 cup buttermilk
  • 1 teaspoon vanilla extract
  • 2 1/2 cups flour
  • 1 teaspoon baking soda
  • 1 teaspoon salt
  • 1 cup nuts, chopped (optional)
Instructions
Preheat oven to 350° F.
Grease either two 8 x 4 inch loaf pans, or one 9 x 5 inch loaf pan.
In a mixing bowl cream together butter and sugar.
Add eggs, banana, buttermilk and vanilla. Mix on medium speed until smooth.
Stir in flour, baking soda, salt and nuts until just combined. Pour batter into pans.
Bake 8-inch loaves 60 minutes, 9-inch loaf 75 minutes, or until toothpick inserted into center comes out clean. Cool 10 minutes.
Remove from pans to cooling rack and cool completely before slicing.

Powered by Recipage